OCR-D Network
1. Why do we need OCR-D Network?
After having processors running locally via the CLI, communication over network is the natural extension. The OCR-D Network package, which is implemented as part of OCR-D/core, allows users to set up OCR-D in a distributed environment. This setup greatly improves the flexibility, scalability and reliability of OCR-D.
2. Terminology
- Processing Worker: a Processing Worker is an OCR-D Processor running as a worker, i.e. listening to the Process Queue, pulling new jobs when available, processing them, and pushing the updated job statuses back to the queue if necessary.
- Processor Server: a Processor Server is an OCR-D Processor running as a server over HTTP. It accepts requests, execute the processor with parameters provided in the requests, and return responses.
- Workflow Server: a Workflow Server is a server which exposes REST endpoints in the
Workflowsection of the Web API specification. In particular, with aPOST /workflow/runrequest a workflow can be executed. The Workflow Server comprises a chain of call to thePOST /processor/run/{executable}endpoint in an appropriate order. - Processing Server: a Processing Server is a server which exposes REST endpoints in the
Processingsection of the Web API specification. In particular, for eachPOST /processor/run/{executable}request, either a processing message is added to the respective Job Queue or a request is delegated to the respective Processor Server. - Process Queue: a Process Queue is a queuing system for workflow jobs (i.e. single processor runs on one workspace) to be executed by Processing Workers and to be enqueued by the Workflow Server via the Processing Server. In our implementation, it’s RabbitMQ.
- Job queue: one or many queues in the Process Queue, which contains processing messages. Processing Workers listen to the job queues.
- Result queue: one or many queues in the Process Queue, which contains result messages. Depending on the configuration in the processing messages, Processing Workers might publish result messages to these queues. A 3rd-party service can listen to these queues to get updated about the job status.
- Processing message: a message published to the job queue. This message contains necessary information for the
Processing Worker to process data and perform actions after the processing has finished. These actions include
POSTing the result message to the provided callback URL, or publishing the result message to the result queue. The schema of processing messages can be found here. - Result message: a message send from a Processing Worker when it has finished processing. This message contains
information about a job (ID, status, etc.). Depending on the configuration in the processing message, a result message
can be
POSTed to the callback URL, published to the result queue, or both. The schema for result messages can be found here. - METS Server: a METS Server makes a workspace accessible over HTTP or Unix file socket. Thanks to this server, all operations on a METS file can be executed asynchronously.
3. The Specification
When having OCR-D running over network, it should expose endpoints to allow users’ interactions. Those endpoints are described here. It follows the OpenAPI specification. Most endpoints are already included in OCR-D/core. The rest could be implemented by the organization which uses it. There are 4 parts in the specification: discovery, processing, workflow, and workspace.
Discovery: The service endpoints in this section provide information about the server. They include, but are not limited to, hardware configuration, installed processors, and information about each processor.
Processing: Via the service endpoints in this section, one can get information about a specific processor, trigger a processor run, and check the status of a running processor. By exposing these endpoints, the server can encapsulate the detailed setup of the system and offer users a single entry to the processors. The implementation of this section is provided by OCR-D/core.
Workflow: Beyond single processors, one can manage
entire workflows, i.e. a series of connected processor
instances. A workflow is a text file that describes the OCR-D workflow using ocrd process syntax.
Workspace: The service endpoints in this section concern data management, which in OCR-D is handled via workspaces. (A workspace is the combination of a METS file and any number of referenced files already downloaded, i.e. with locations relative to the METS file path.) Processing (via single processors or workflows) always refers to existing workspaces, i.e. workspaces residing in the server’s file system.
4. Suggested OCR-D System Architecture
This document presents two possible architecture setup using OCR-D Network and the technical details behind. In both setup, all servers are implemented using FastAPI. Behind the scene, it runs Uvicorn, an ASGI web server implementation for Python. RabbitMQ is used for the Process Queue, and MongoDB is the database system. There are many options for a reverse proxy, such as Nginx, Apache, or HAProxy. From our side, we recommend using Traefik.
4.1 Processors as workers
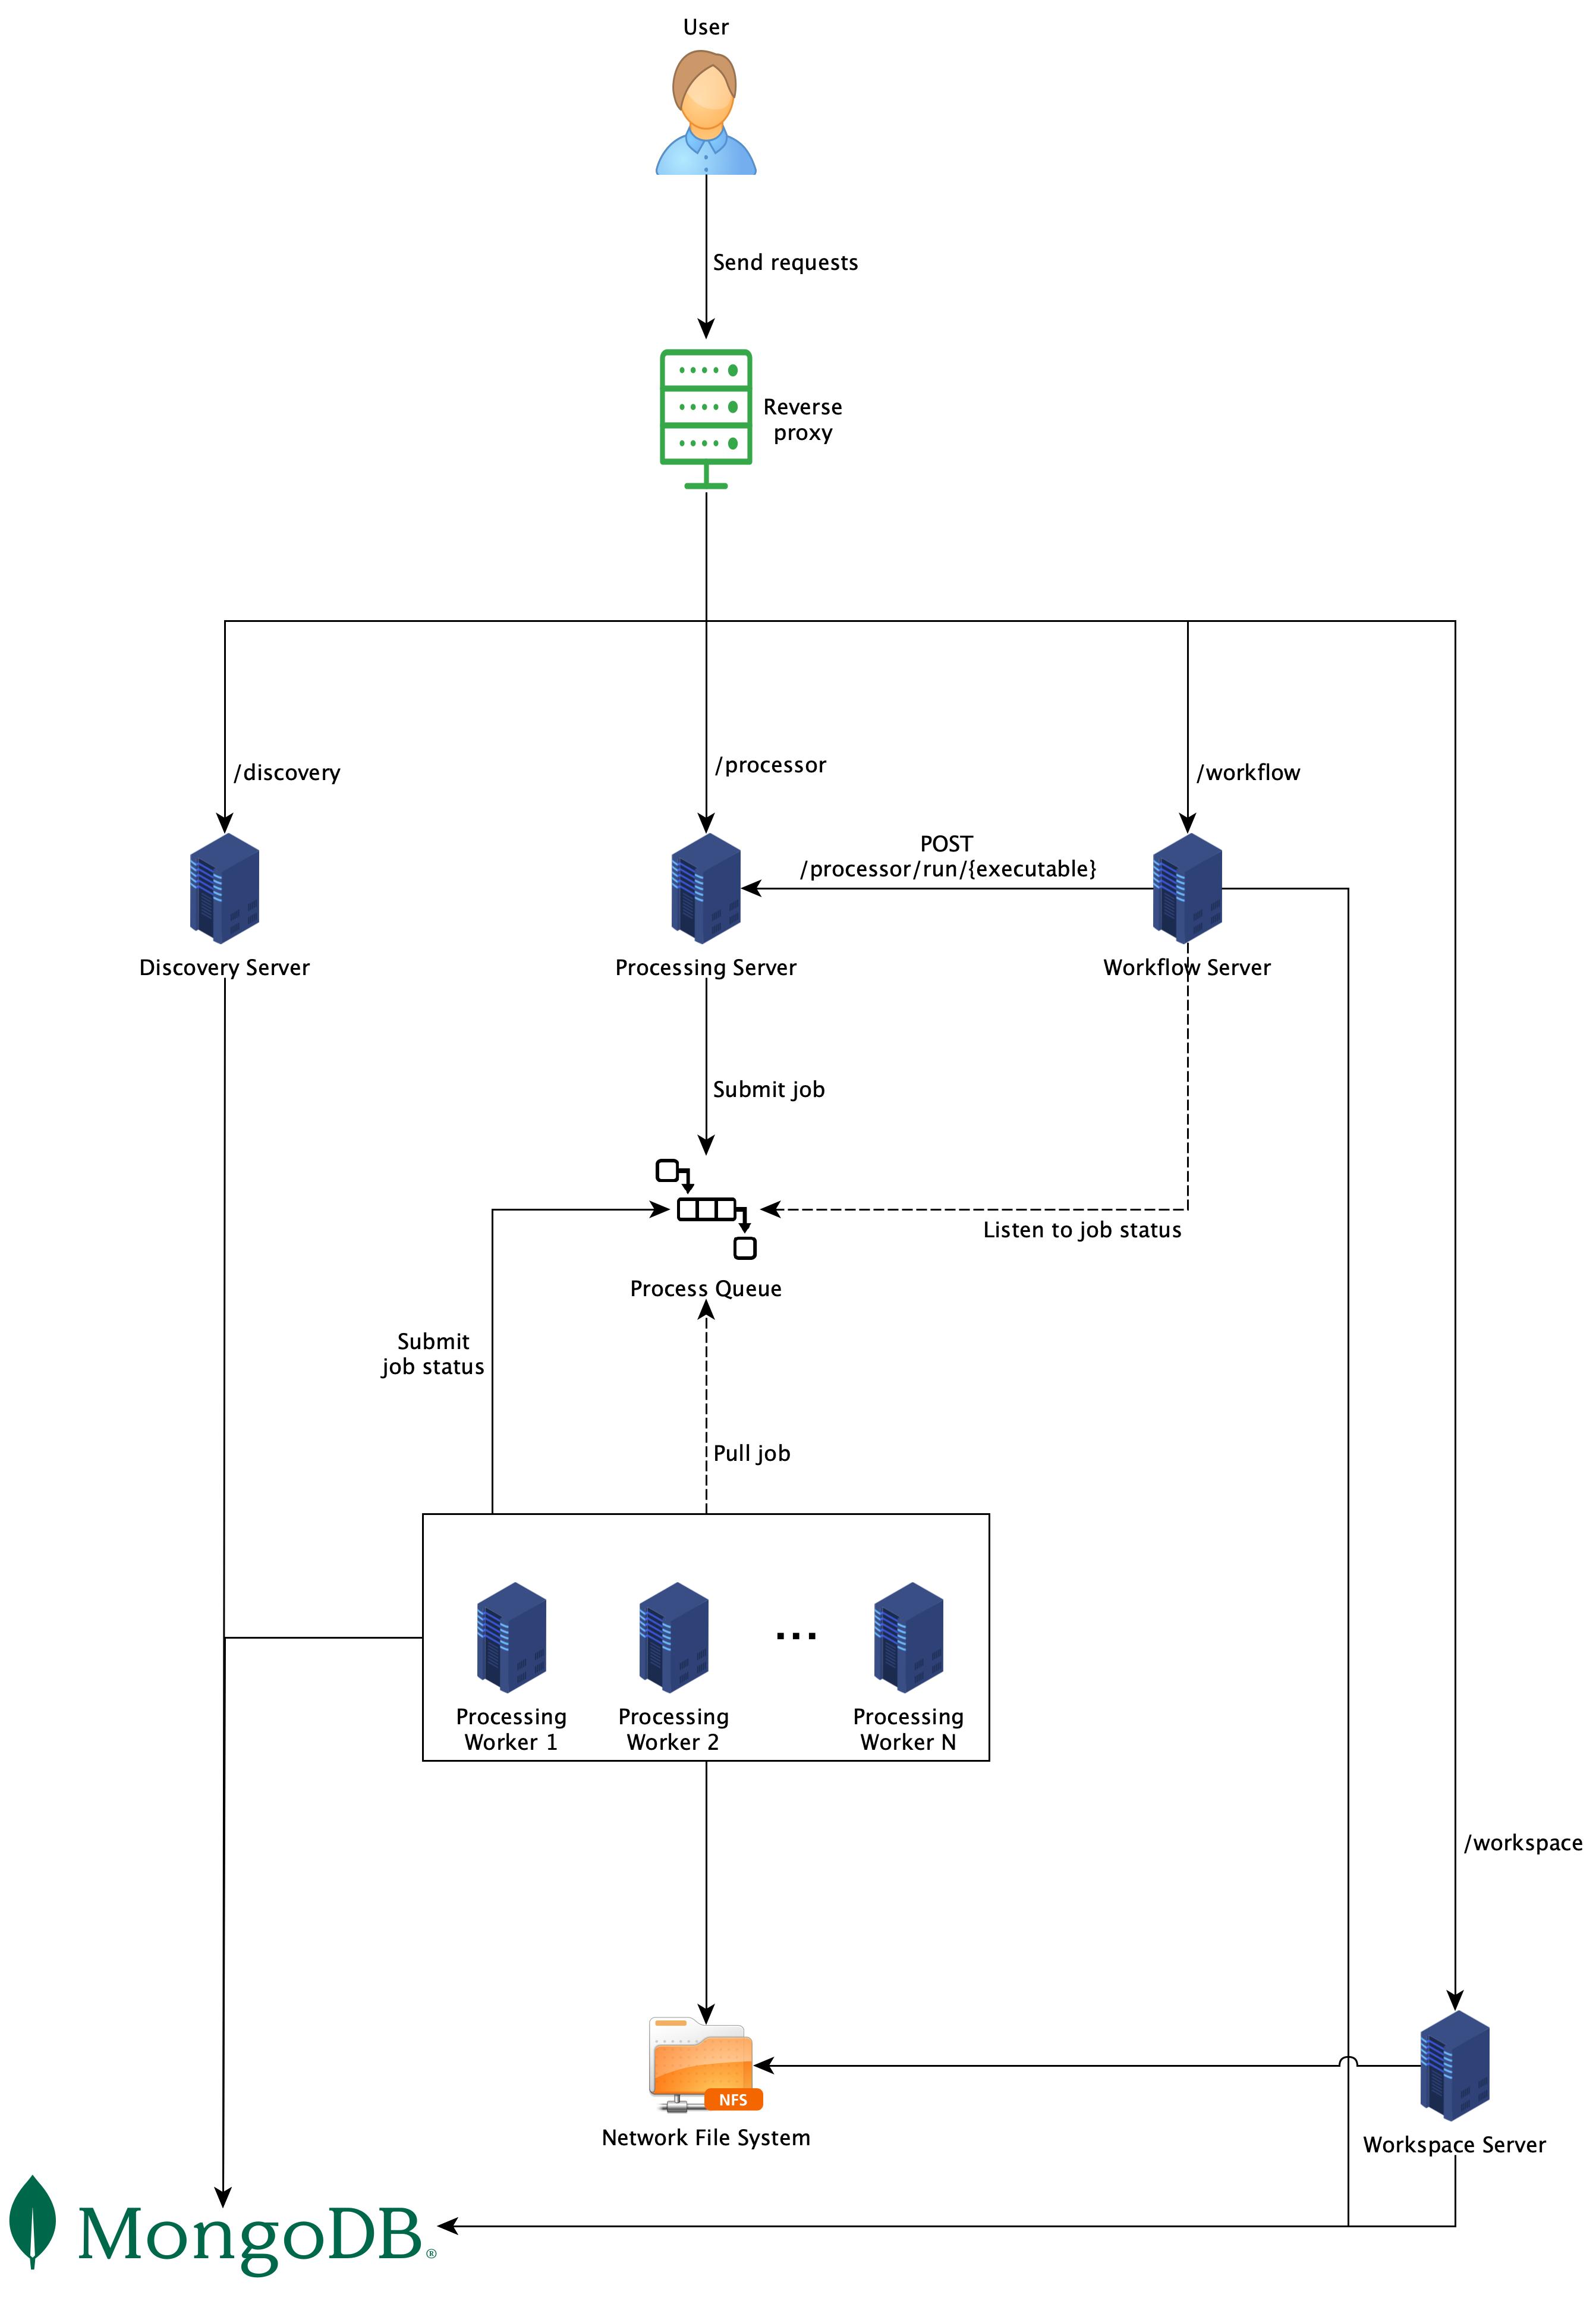
As shown in Fig. 1, each section in the Web API specification is implemented by different servers, which are Discovery Server, Processing Server, Workflow Server, and Workspace Server respectively. Although each server in the figure is deployed on its own machine, it is completely up to the implementers to decide which machines run which servers. However, having each processor run on its own machine reduces the risk of version and resource conflicts. Furthermore, the machine can be customized to best fit the processor’s hardware requirements and throughput demand. For example, some processors need GPU computation, while others do not, or some need more CPU capacity while others need more memory.
Processing: once a request arrives, it will be pushed to a job queue. A job queue always has the same name as its
respective processors. For example, ocrd-olena-binarizeprocessors listen only to the queue
named ocrd-olena-binarize. A Processing Worker, which is
an OCR-D Processor running as a worker, listens to the queue, pulls
new jobs when available, processes them, and push the job statuses back to the queue if necessary. One normally does not
run a Processing Worker directly, but via a Processing Server. Job statuses can be pushed back to the queue, depending
on the job configuration, so that other services get updates and act accordingly.
Database: in this architecture, a database is required to store information such as users requests, jobs statuses, workspaces, etc. MongoDB is required here.
Network File System: in order to avoid file transfer between different machines, it is highly recommended to have
a Network File System (NFS) set up. With NFS, all Processing
Servers(specifically processors) can work in a shared storage environment and access files as if they are local files.
To get data into the NFS, one could use the POST /workspace endpoint to
upload OCRD-ZIPfiles. However, this approach is only appropriate for testing or
very limited data sizes. Usually, Workspace Server should be able to pull data from other storage.
4.2 Processors as servers
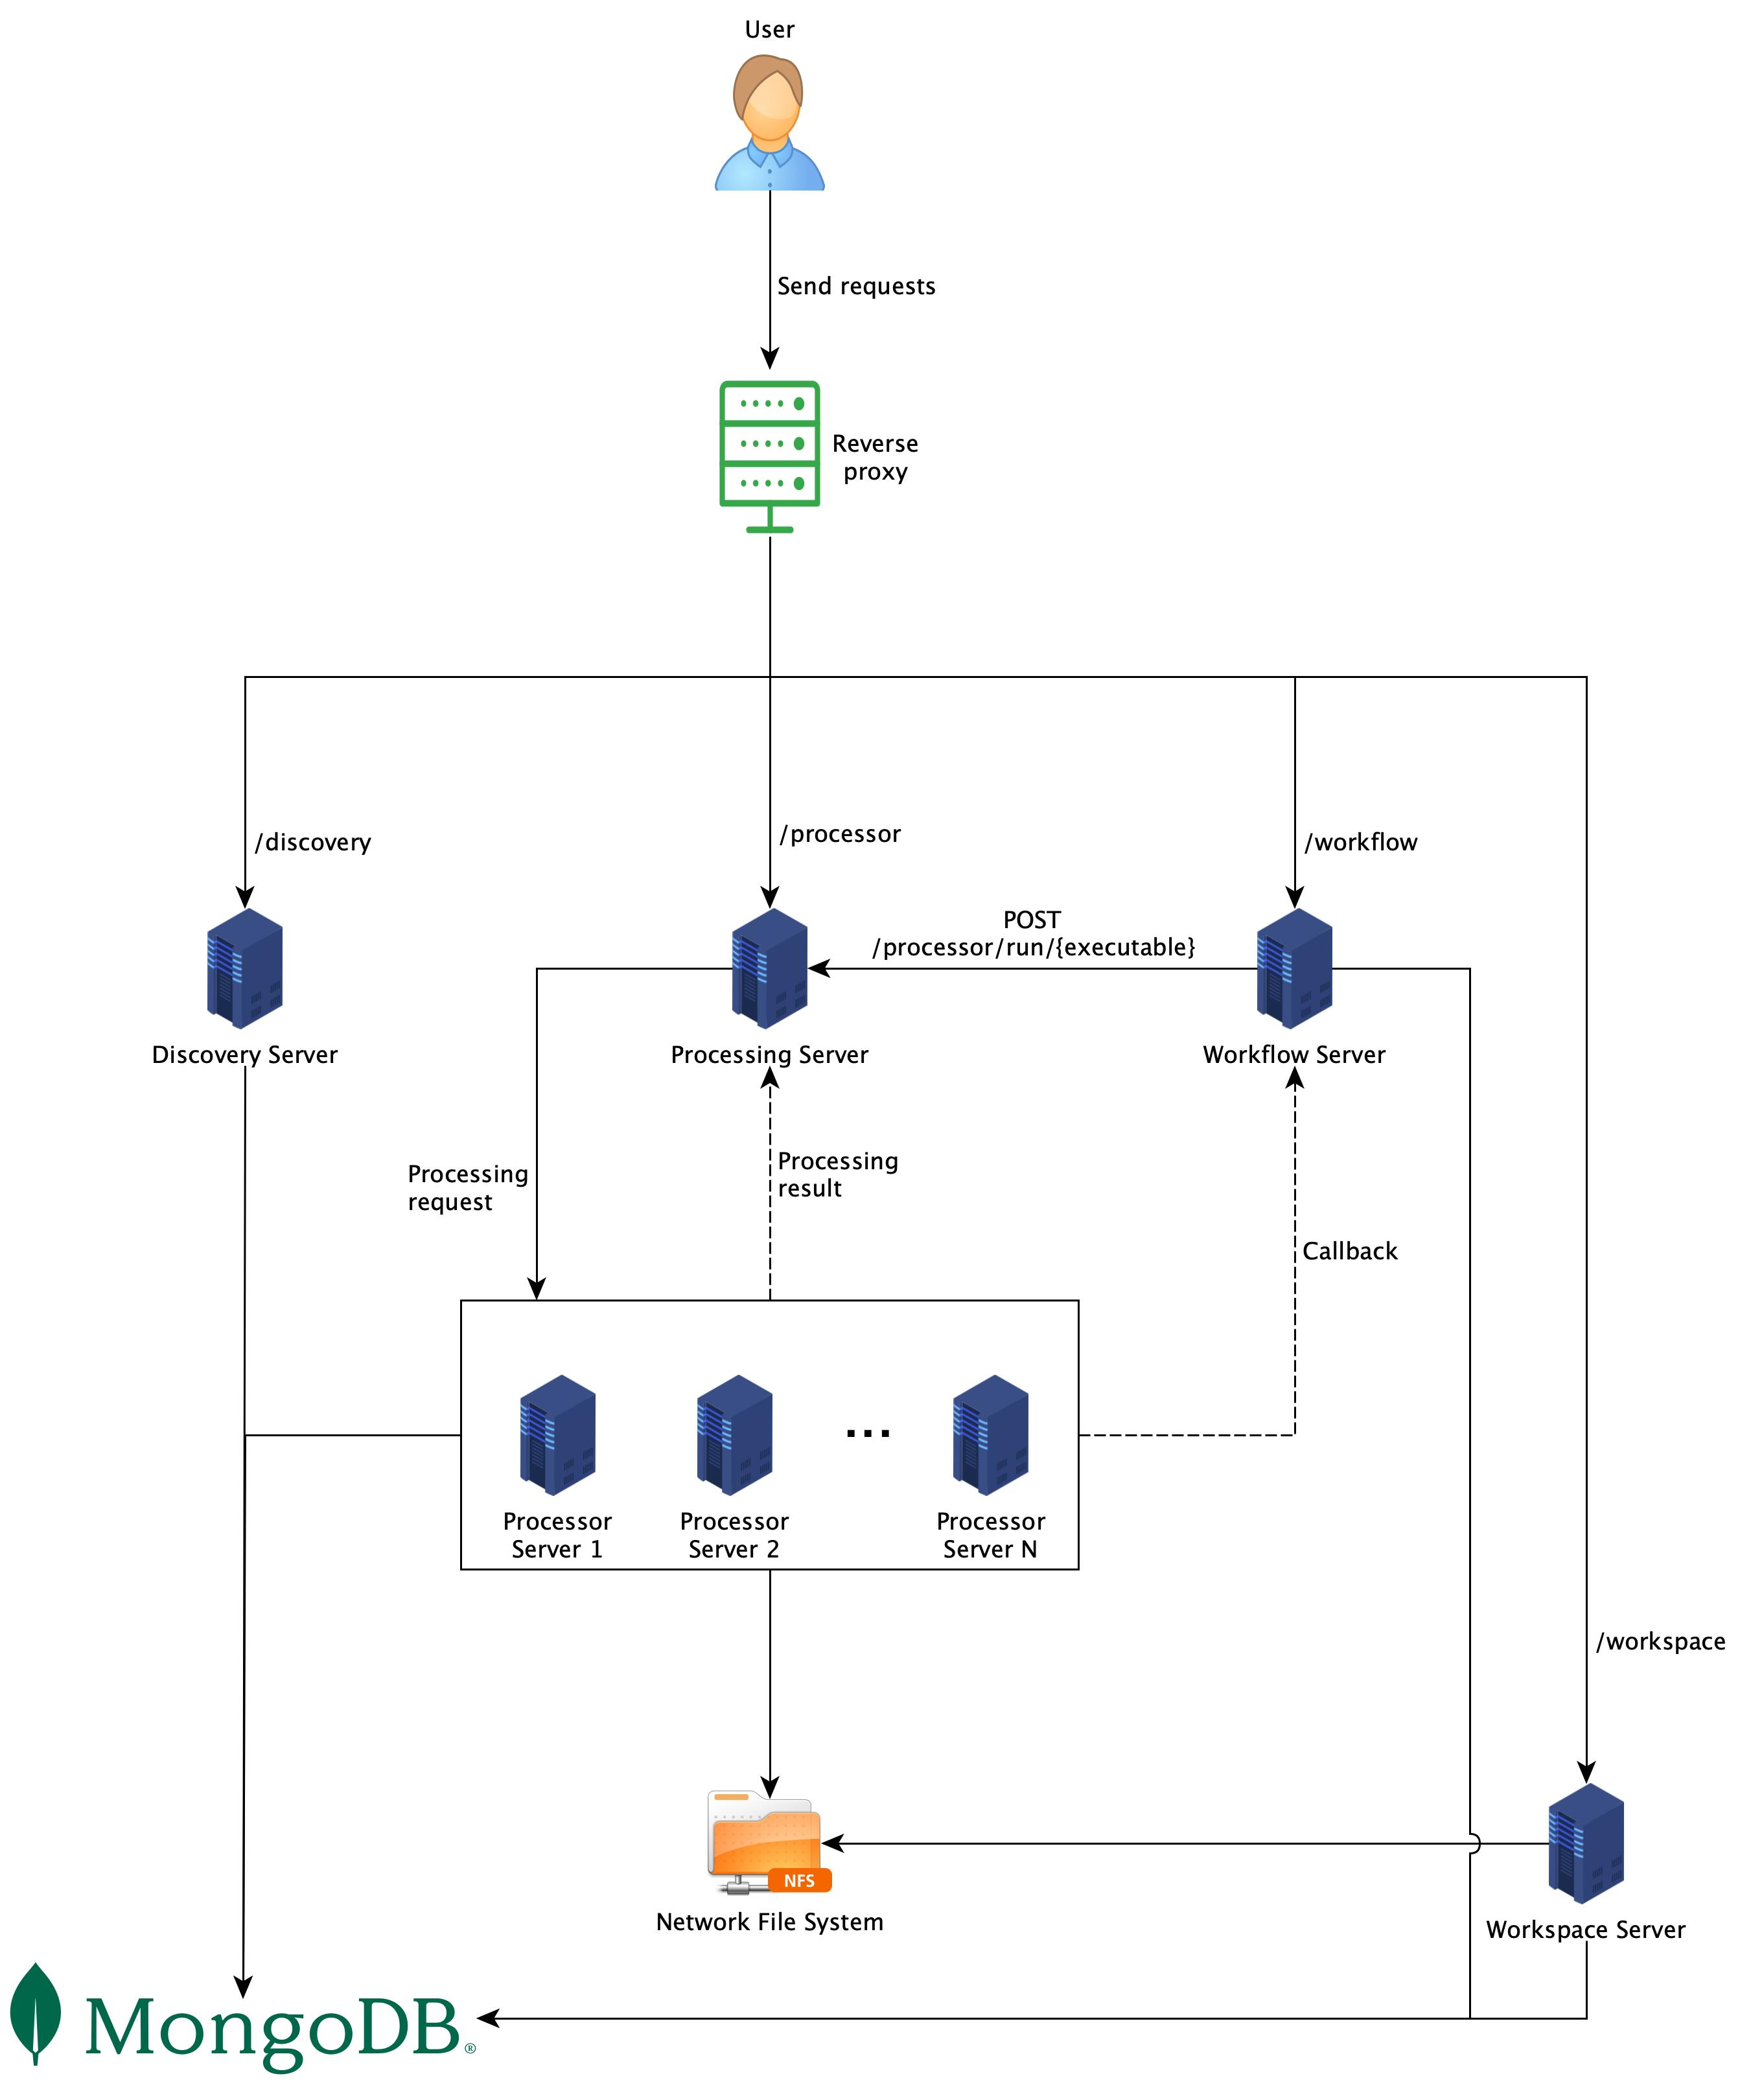
The difference between this architecture and the one shown in Fig. 1 is the processors. In this architecture, each processor runs as a server and exposes one endpoint. When the Processing Server receives a request, it will forward that request to the respective Processor Server and wait for the response.
This architecture is simpler than the other one, since there is no need to have a Process Queue involved. Without a queue, all communications are synchronous. It means that clients need to wait for responses from Processing Server. It might take a long time, therefore high timeout is recommended.
5. Usage
Both setups above can be used as follows:
- Retrieve information about the system via endpoints in the
Discoverysection. - Create a workspace (from an OCRD-ZIP or METS URL) via the
POST /workspaceendpoint and get back a workspace ID. - Create a workflow by uploading a workflow script to the system via the
POST /workflowendpoint and get back a workflow ID. - One can either:
- Trigger a single processor on a workspace by calling the
POST /processor/run/{executable}endpoint with the chosen processor name, workspace ID and parameters, or - Start a workflow on a workspace by calling the
POST /workflow/runendpoint with the chosen workflow ID and workspace ID. - In both cases, a job ID is returned.
- Trigger a single processor on a workspace by calling the
- With the given job ID, it is possible to check the job status by calling:
GET /processor/job/{job-id}for a single processor, orGET /workflow/job/{job-id}for the workflow.
- Download the resulting workspace via the
GET /workspace/{workspace-id}endpoint and get back an OCRD-ZIP. Set the request header toAccept: application/jsonin case you only want the meta-data of the workspace but not the files.
6. Technical Details
6.1 How does Processing Server process requests?
As one can see from two setups above, the Processing Server needs to go through many steps when it receives a request. These steps are illustrated in Fig. 3 below.
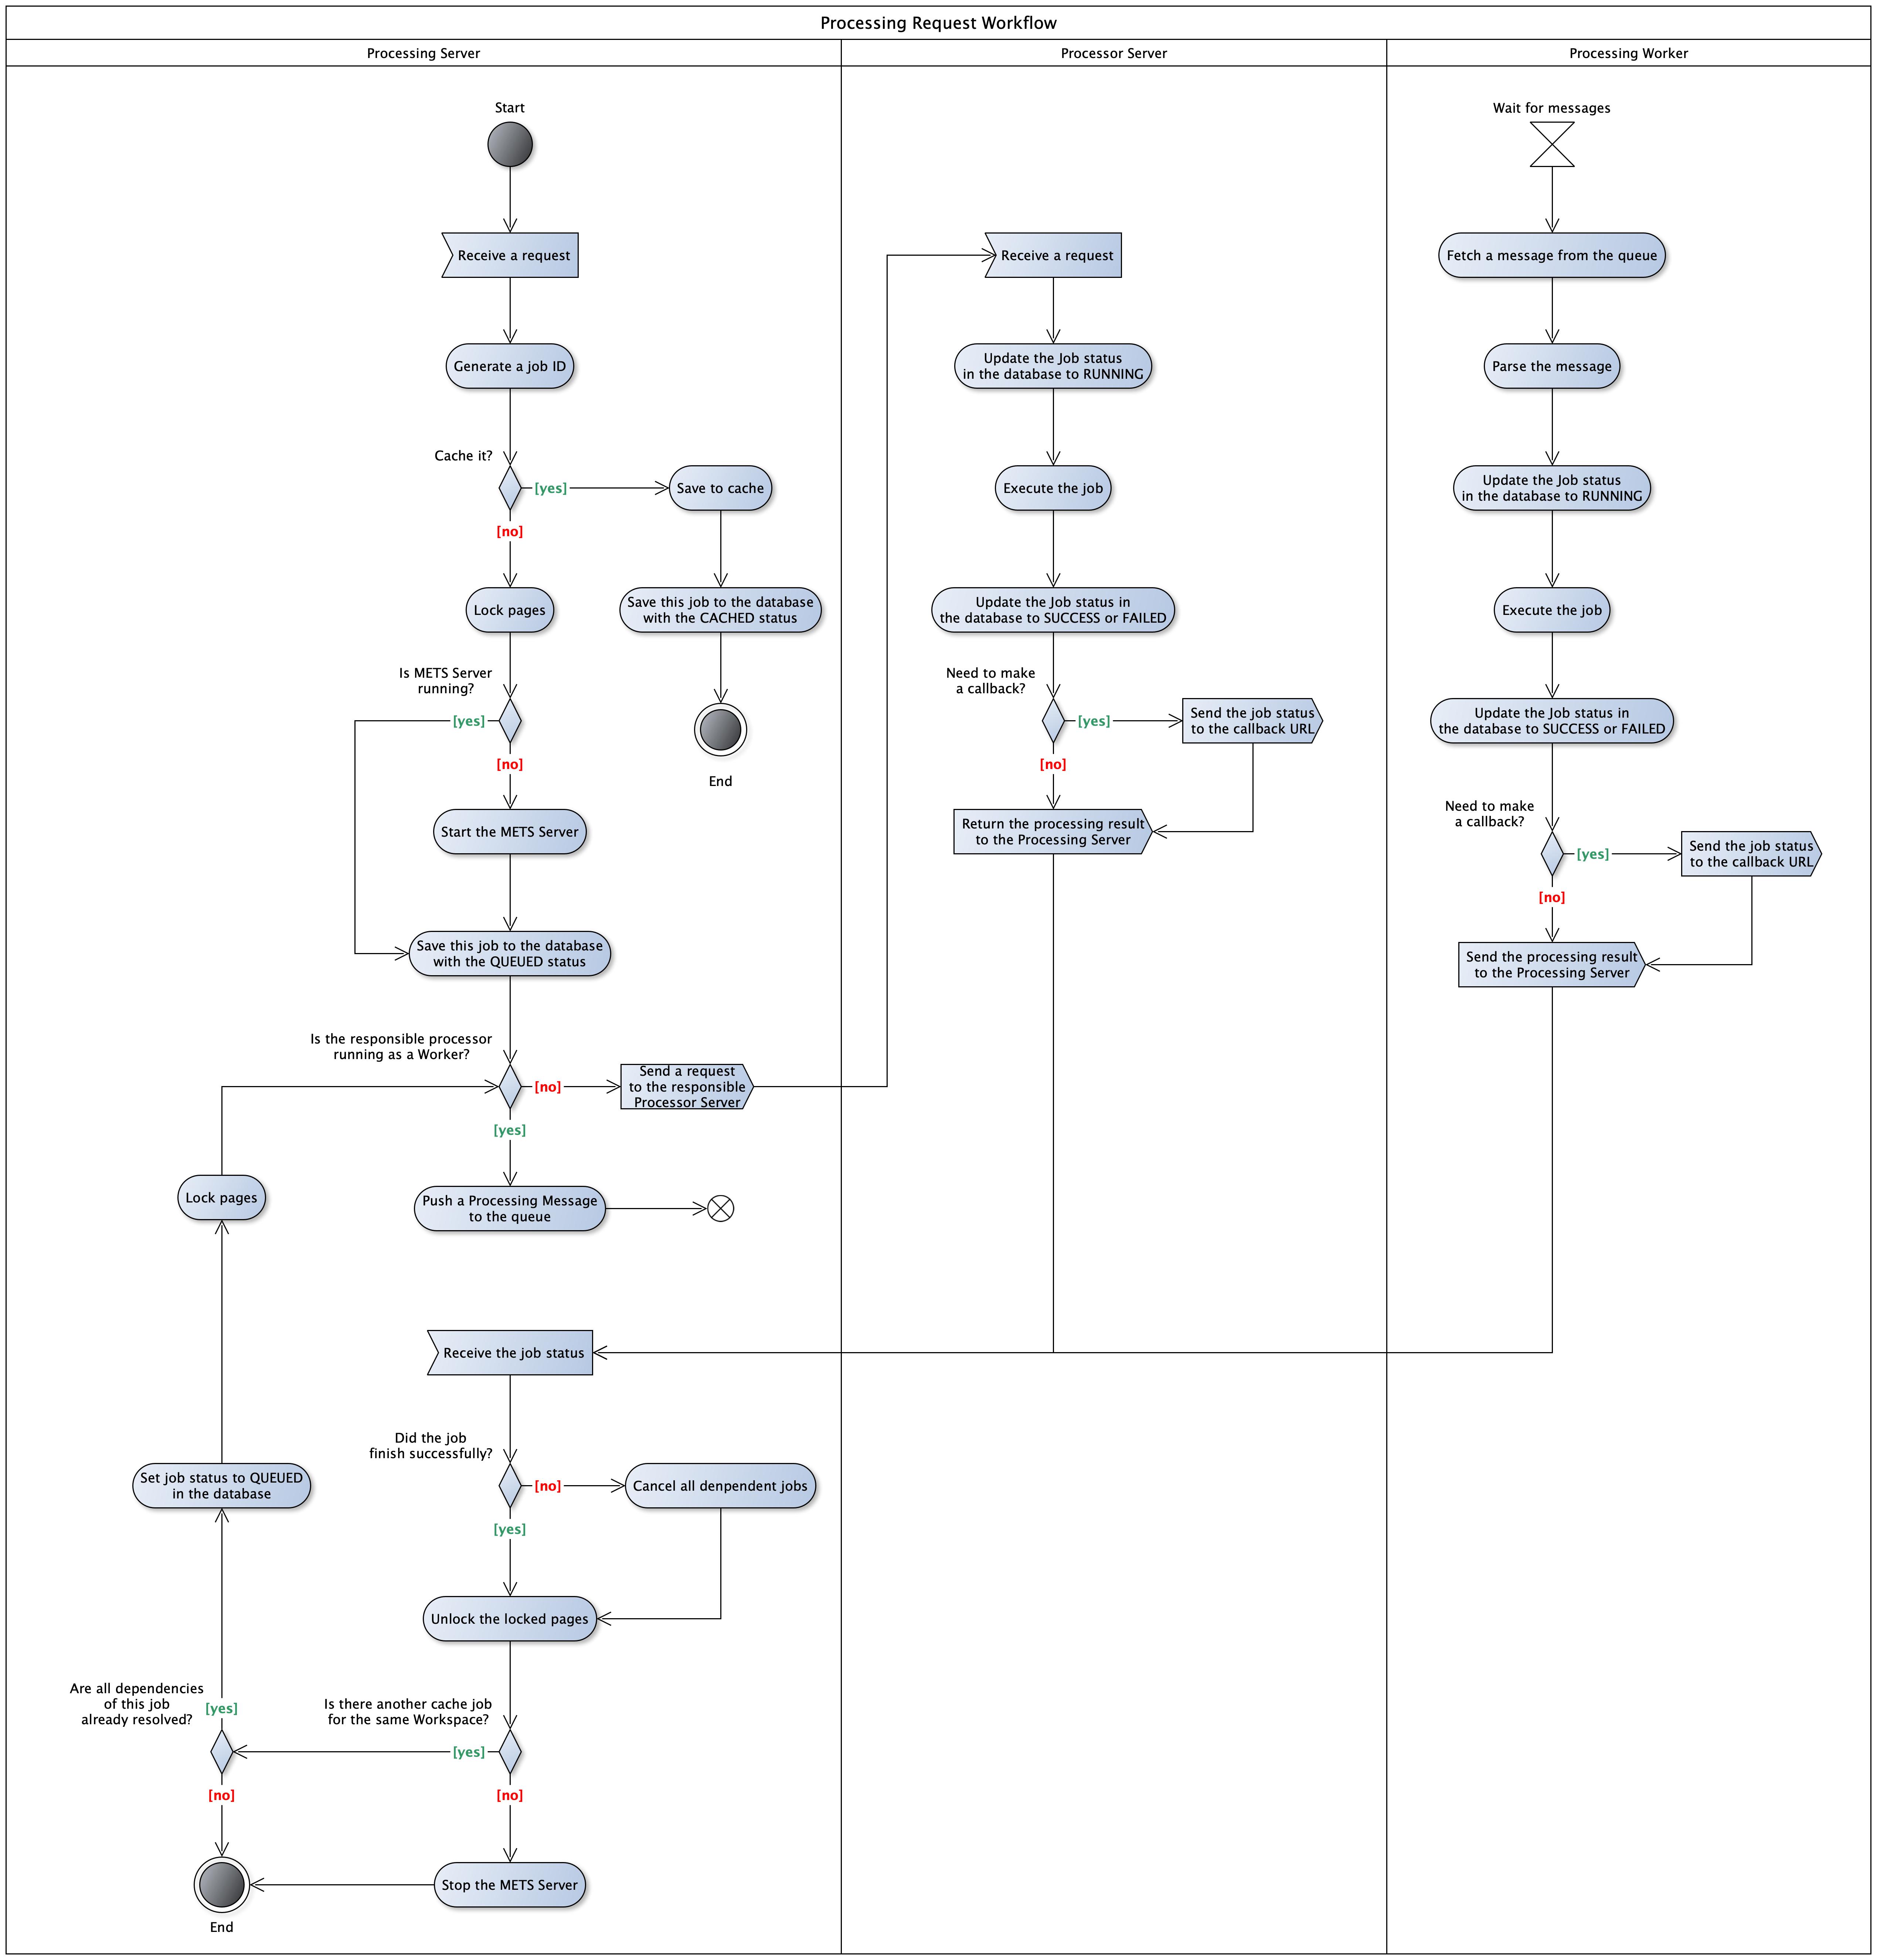
Job cache: there are usually dependencies between jobs, i.e. one job can only run after other jobs are finished. To
support this, when the Processing Server receives a job at /processor/run/{processor-name} endpoint, it first checks
if all dependent jobs are finished or not. If not, the new coming job will be cached and then executed later.
Page lock: to avoid conflict, only one job is allowed to write to a page group at a time. Therefore, before a job is executed, its output file group is locked so that other jobs cannot write to it. The group will then be unlocked when the job finished. If a job needs to write to a locked file group, it will be cached and executed later.
6.2 Processing Server
A Processing Server is a server which exposes REST endpoints in the Processing section of
the Web API specification. In the queue-based system architecture, a Processing Server is responsible for
deployment management and enqueuing workflow jobs. For the former, a Processing Server can deploy, re-use, and shutdown
Processing Workers, Process Queue, and Database, depending on the configuration. For the latter, it decodes requests and
delegates them to the Process Queue. Additionally, it is possible to start the needed components externally, with
Docker. Therefore skip_deployment: true can be set in the process_queue and database section of the configuration
file.
To start a Processing Server, run
$ ocrd network processing-server --address=<IP>:<PORT> /path/to/config.yml
This command starts a Processing Server on the provided IP address and port. It accepts only one argument, which is the path to a configuration file. The schema of a configuration file can be found here. Below is a small example of how the file might look like.
process_queue:
  address: localhost
  port: 5672
  credentials:
    username: admin
    password: admin
  ssh:
    username: cloud
    path_to_privkey: /path/to/file
database:
  address: localhost
  port: 27017
  credentials:
    username: admin
    password: admin
  ssh:
    username: cloud
    password: "1234"
hosts:
  - address: localhost
    username: cloud
    password: "1234"
    workers:
      - name: ocrd-cis-ocropy-binarize
        number_of_instance: 2
        deploy_type: native
      - name: ocrd-olena-binarize
        number_of_instance: 1
        deploy_type: docker

  - address: 134.76.1.1
    username: tdoan
    path_to_privkey: /path/to/file
    workers:
      - name: ocrd-eynollah-segment
        number_of_instance: 1
        deploy_type: native
There are three main sections in the configuration file.
process_queue: it contains theaddressandport, where the Process Queue is deployed, or will be deployed with the specifiedcredentials. If thesshproperty is presented, the Processing Server will try to connect to theaddressviasshwith providedusernameandpasswordand deploy RabbitMQ at the specifiedport. The remote machine must have Docker installed since the deployment is done via Docker. Make sure that the providedusernamehas enough rights to run Docker commands. In case thesshproperty is not presented, the Processing Server assumes that RabbitMQ was already deployed and just uses it.database: this section also contains theaddressandport, where the MongoDB is running, or will run. Ifcredentialsis presented, it will be used when deploying and connecting to the database. Thesshsection behaves exactly the same as described in theprocess_queuesection above.hosts: this section contains a list of hosts, usually virtual machines, where Processing Workers should be deployed. To be able to connect to a host, anaddressandusernameare required, then comes eitherpasswordorpath_to_privkey(path to a private key). All Processing Workers, which should be deployed, must be declared under theworkersproperty. In casedeploy_typeisdocker, make sure that Docker is installed in the target machine and the providedusernamehas enough rights to execute Docker commands.
Among three sections, process_queue and database are required, hosts is optional. Processing Workers can
additionally be start externally and register themselves to the process_queue`. For more information, please check the
configuration file schema.
6.3 Process Queue
By using a queuing system for individual per-workspace per-job processor runs, specifically as message queuing with RabbitMQ, the reliability and flexibility of the Processing Server are greatly improved over a system directly coupling the workflow engine and distributed processor instances.
In our implementation of the Process Queue, manual acknowledgment mode is used. This means, when a Processing Worker
finishes successfully, it sends a positive ACK signal to RabbitMQ. In case of failure, it tries again three times before
sending a negative ACK signal. When a negative signal is received, RabbitMQ will re-queue the message. If there is not
any ACK signal sent for any reason (e.g. consumer crash, power outage, network problem, etc.), RabbitMQ will
automatically re-queue the message after timeout, which is 30 minutes by default. This behavior, however, can
be overridden by setting another value for
the consumer_timeout property in the rabbitmq.conf file.
To avoid processing the same input twice (in case of re-queuing), a Processing Worker first checks
the redeliver property to see if this message was
re-queued. If yes, and the status of this process in the database is not SUCCESS, it will process the data described
in the message again.
When a Processing Server receives a request, it creates a message based on the request content, then push it to a
job queue. A job queue always has the same name as its respective processors. For example, ocrd-olena-binarize
processors listen only to the job queue named ocrd-olena-binarize. Below is an example of how a message looks like.
For a detailed schema, please check the message schema.
job_id: uuid
processor_name: ocrd-cis-ocropy-binarize

path_to_mets: /path/to/mets.xml
input_file_grps:
  - OCR-D-DEFAULT
output_file_grps:
  - OCR-D-BIN
page_id: PHYS_001,PHYS_002
parameters:
  params_1: 1
  params_2: 2

result_queue_name: ocrd-cis-ocropy-binarize-result
callback_url: https://my.domain.com/callback
internall_callback_url: http://ocrd-processing-server:8000

created_time: 1668782988590
In the message content, job_id, processor_name, internal_callback_url and created_time are added by the
Processing Server, while the rest comes from the body of the POST /processor/run/{executable} request.
Instead of path_to_mets, one can also use workspace_id to specify a workspace. An ID of a workspace can be obtained
from the Workspace Server which is not part of OCR-D core.
In case result_queue_name property is present, the result of the processing will be pushed to the queue with the
provided name. If the queue does not exist yet, it will be created on the fly. This is useful when there is another
service waiting for the results of processing. That service can simply listen to that queue and will be immediately
notified when the results are available. Below is a simple Python script to demonstrate how a service can listen to
the result_queue_name and act accordingly.
import pika, sys, os

def main():
    credentials = pika.PlainCredentials('username', 'password')
    connection = pika.BlockingConnection(pika.ConnectionParameters(host='my.domain.name', port=5672, credentials=credentials))
    channel = connection.channel()

    # Create the result queue, in case it does not exist yet
    result_queue_name = 'ocrd-cis-ocropy-binarize-result'
    channel.queue_declare(queue=result_queue_name)

    def callback(ch, method, properties, body):
        print(' [x] Received %r' % body)

    channel.basic_consume(queue=result_queue_name, on_message_callback=callback, auto_ack=True)

    print(' [*] Waiting for job results.)
    channel.start_consuming()
It is important that the result queue exists before one starts listening on it, otherwise an error is thrown. The best way to ensure this is trying to create the result queue in the listener service, as shown in the Python script above. In RabbitMQ, this action is idempotent, which means that the creation only happens if the queue doesn’t exist yet, otherwise nothing will happen. For more information, please check the RabbitMQ tutorials.
If the callback_url in the processing message is set, a POST request will be made to the provided endpoint when the
processing is finished. The body of the request is the result message described below.
The schema for result messages can be found here. This message is sent to the callback URL or to the result queue, depending on the configuration in the processing message. An example of the message looks like this:
job_id: uuid
status: SUCCESS
path_to_mets: /path/to/mets.xml
With the returned job_id, one can retrieve more information by sending a GET request to
the /processor/job/{job_id} endpoint, or to /processor/log/{job_id} to get all logs of that
job.
6.4 Processing Worker
A Processing Worker can be started manually, or it can be managed by a Processing Server via a configuration file. There are the two ways to start a processing worker:
# 1. Use processor name
$ <processor-name> worker --queue=<queue-address> --database=<database-address>

# 2. Use ocrd CLI bundled with OCR-D/core
$ ocrd network processing-worker <processor-name> --queue=<queue-address> --database=<database-address>
--queue: a Rabbit MQ connection string to a running instance.--database: a MongoDB connection string to a running instance.
6.5 Processor Server
Same as Processing Worker, there are also two ways to start a Processor Server:
# 1. Use processor name
$ <processor-name> server --address=<server-address> --database=<database-address>

# 2. Use ocrd CLI bundled with OCR-D/core
$ ocrd network processor-server <processor-name> --queue=<queue-address> --database=<database-address>
--address: The URL/address to run the processor server on, format: host:port.--database: a MongoDB connection string to a running instance.
6.6 Database
A database is required to store necessary information such as users requests, jobs statuses, workspaces, etc. MongoDB is used in this case. To connect to MongoDB via a Graphical User Interface, MongoDB Compass is recommended.